Exploring the vRealize Automation 7.0 Event Broker – Part 2

Abstract

In a previous article, we introduced the Event Broker in vRealize Automation 7.0 and walked through some simple examples of how to subscribe to events in a provisioning workflow.

In this article, we are continuing our exploration by using the Event Broker to implement a more realistic example. We will walk through how to create a simple validation workflow for virtual machines and how to use the Event Broker to drive it.

The problem

In our imaginary organization, we have a policy that no development VM should ever be larger than 2 CPUs/4GB RAM. If we violate that restriction, the VM provisioning process should stop with an error message. Also, if a VM is larger than 1CPU/2GB RAM, we want a notification email to be sent to the infrastructure manager.

Currently, we implement this restriction through blueprints and business groups, but we have noticed that some groups in our organization don’t seem to enforce these rules and allow creation of blueprints that allow bigger machines. Instead of manually policing this, we want to build a mechanism that enforces these rules, no matter which business group or blueprint they come from.

The solution

Blocking subscriptions

Rather than just listening to events, we need to influence the provisioning process if a user tries to create a machine that’s too large. To do this, we need to introduce the concept of blocking subscriptions.

In a typical publish/subscribe scenario, events are delivered asynchronously to subscribers. Sometimes we call this a “fire and forget” mode of delivery. Once a running workflow has fired an event, it keeps on running and doesn’t keep track of whether the event was picked up or if the subscriber needed something to happen to the workflow.

Blocking subscriptions are different in that they actually pause the workflow until they have been fully process by the subscribers. Furthermore, a subscriber can send feedback to the workflow by modifying variables or throwing exceptions. Since our validation workflow is going to cause a provisioning workflow to fail if the sizing of a VM violates our limits, blocking subscriptions seem perfect for us!

Defining the subscription

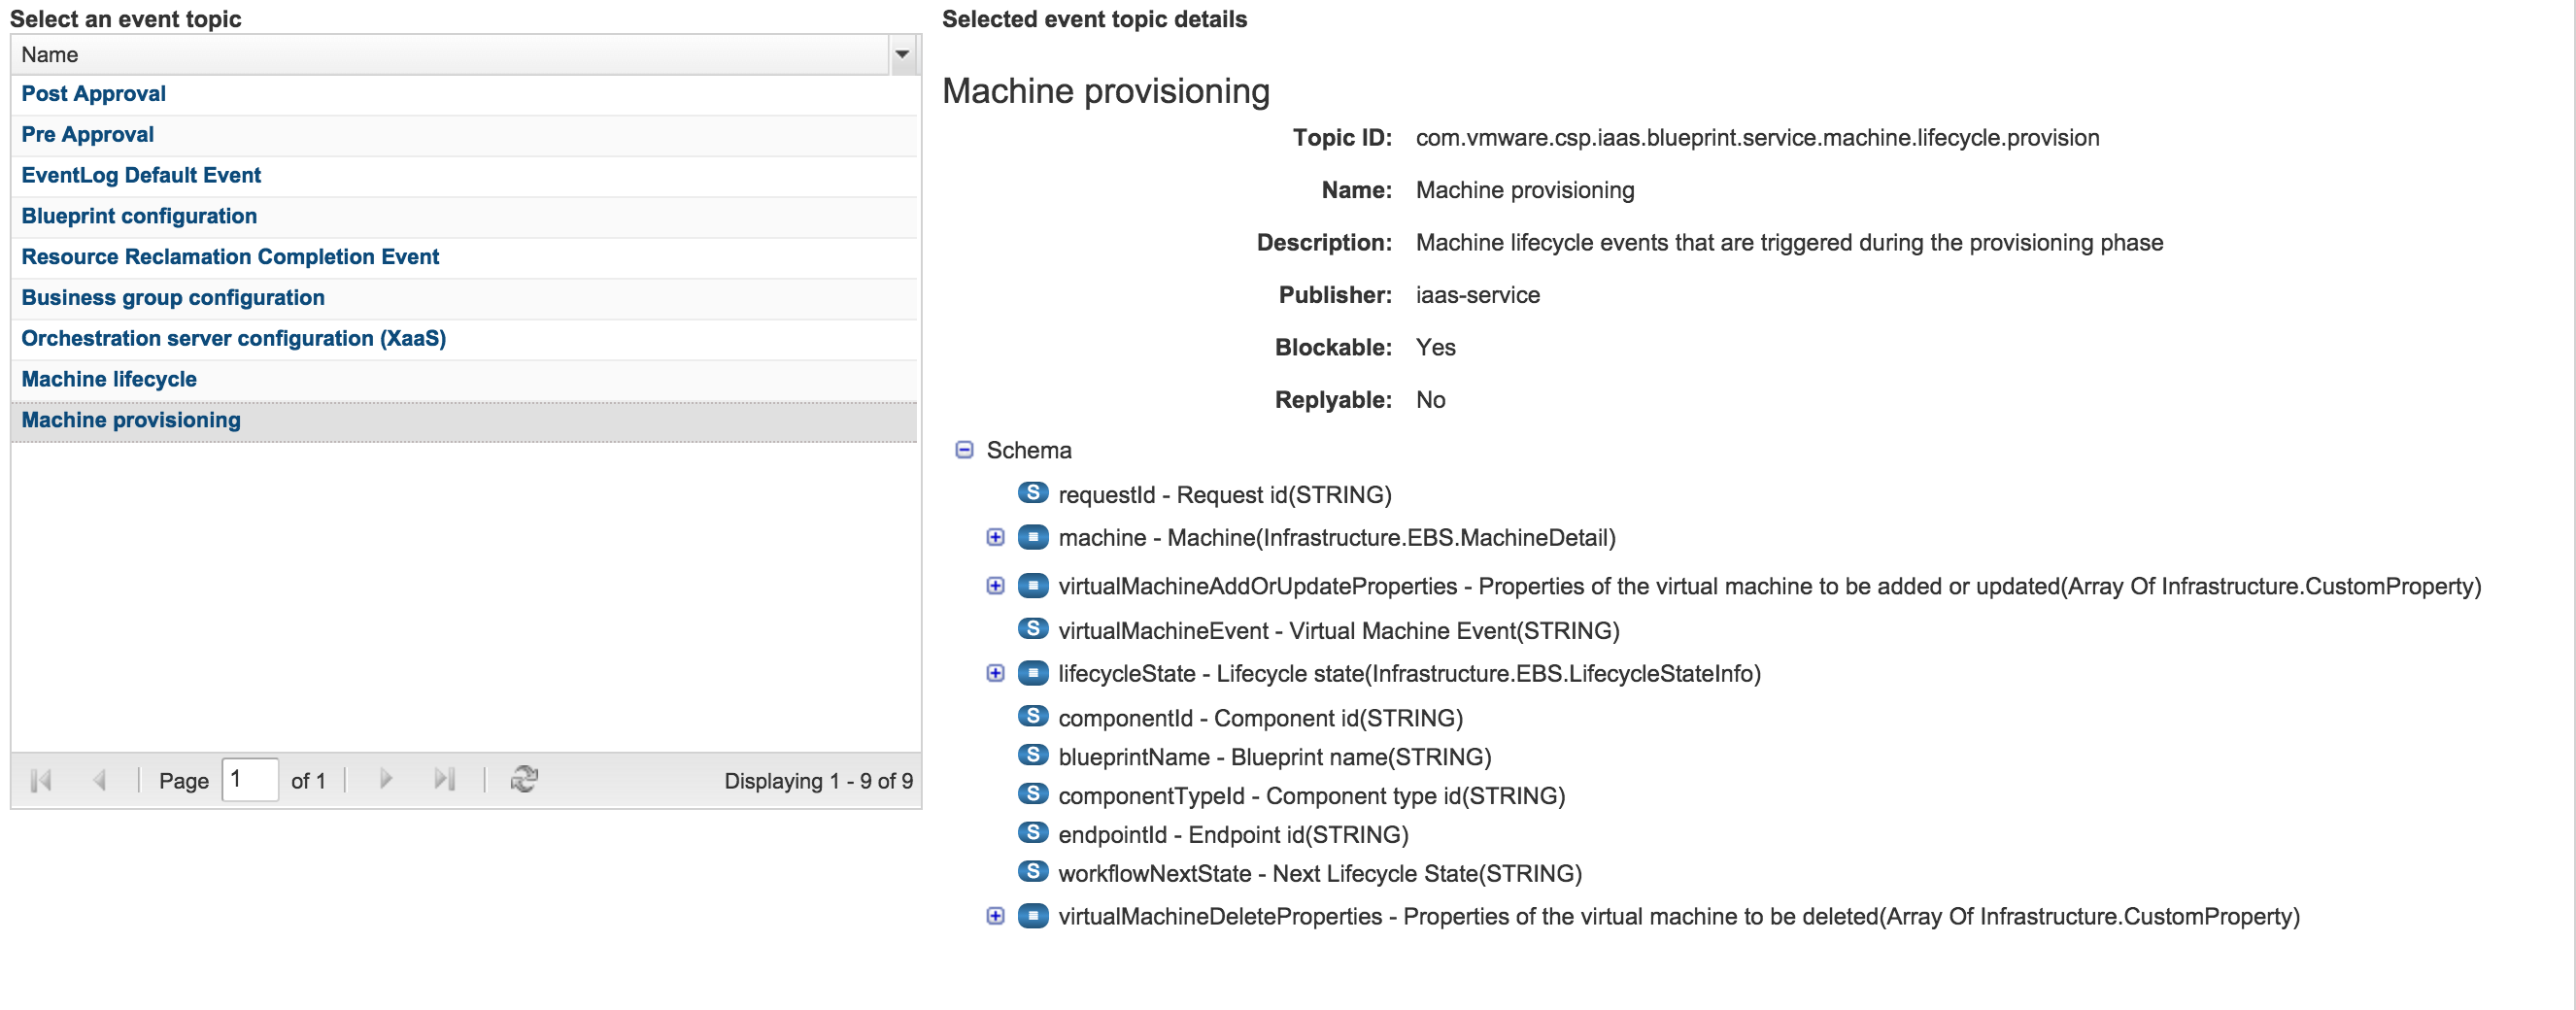
We’re setting up the first part of the event subscription the same way we did in the previous article. Since we want to check things before we provision a machine, we subscribe to the PRE-condition of the BuildingMachine-event.

Screen Shot 2016-01-07 at 11.22.49 AM

Configuring a blocking subscription

Whether a subscription is blocking must be determined when you create the subscription and can’t be subsequently changed. We specify this in the last screen of the subscription definition.

Screen Shot 2016-01-08 at 3.50.26 PM

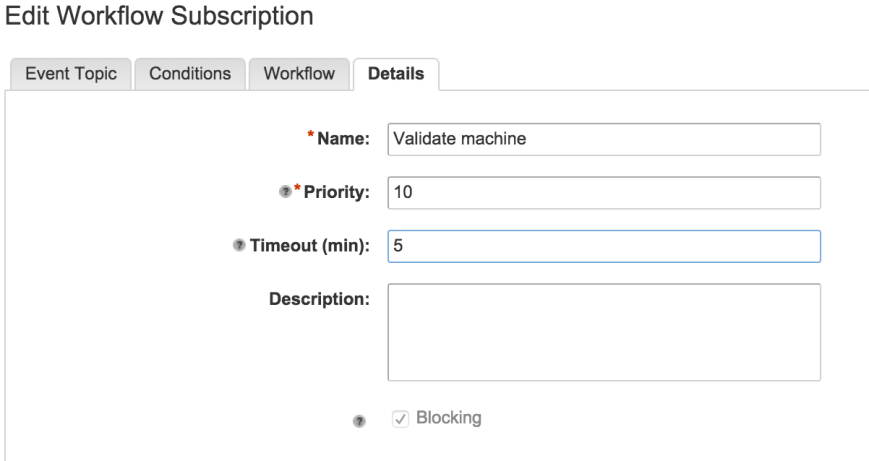
Notice the checkbox marked “Blocking”!

When we make a subscription blocking, we also need to specify its priority and timeout. The priority helps us run the subscriptions in a deterministic order. The subscriptions will be run in an ascending order of priority (lowest number first). Since blocking subscriptions pause the workflow while they’re executing we need to prevent workflows from “hanging” indefinitely if some code called by a subscription is faulty and doesn’t return within a reasonable amount of time. The default timeout is 30 minutes, but since the checks we’re going to perform are very simple, 5 minutes should be more than enough. If our subscription hasn’t finished after 5 minutes, something is definitely wrong!

Enabling properties passing

By default, the virtual machine properties aren’t passed to subscription workflows. To do this, we need to set the property Extensibility.Lifecycle.Properties.VMPSMasterWorkflow32.BuildingMachine.

You can set the property at any level, including the blueprint, business group, reservation, etc. In our case, we’re defining it on the vCenter endpoint. This way, anything that comes from that endpoint will pass the properties to any subscribers.

The value of the property should be the names of the properties you want to pass. Wildcards are accepted, so we’re just setting it to “*”, meaning all properties are passed.

Screen Shot 2016-01-21 at 12.22.39 PM

Designing the vRO workflow

Our vRO workflow will simply dig out the memory and CPU settings from the provisioning data and compare them to the limits we specified. If we hit the “hard” limit, we should halt the provisioning with an error message. If we only hit the “soft” limit, we let the provisioning continue, but send a notification email.

Screen Shot 2016-01-08 at 4.02.49 PM

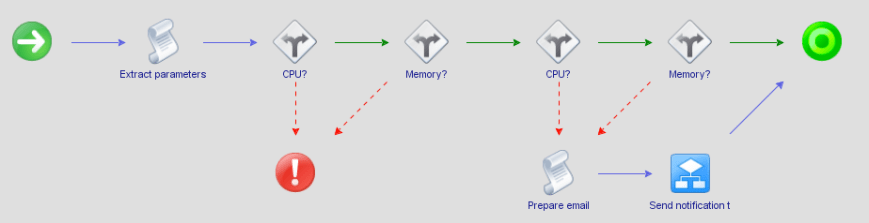
Parsing the parameters

The checks should be somewhat self-explanatory, but let’s have a look what goes on in the first scriptable task (Extract parameters).

Screen Shot 2016-01-08 at 4.04.53 PM

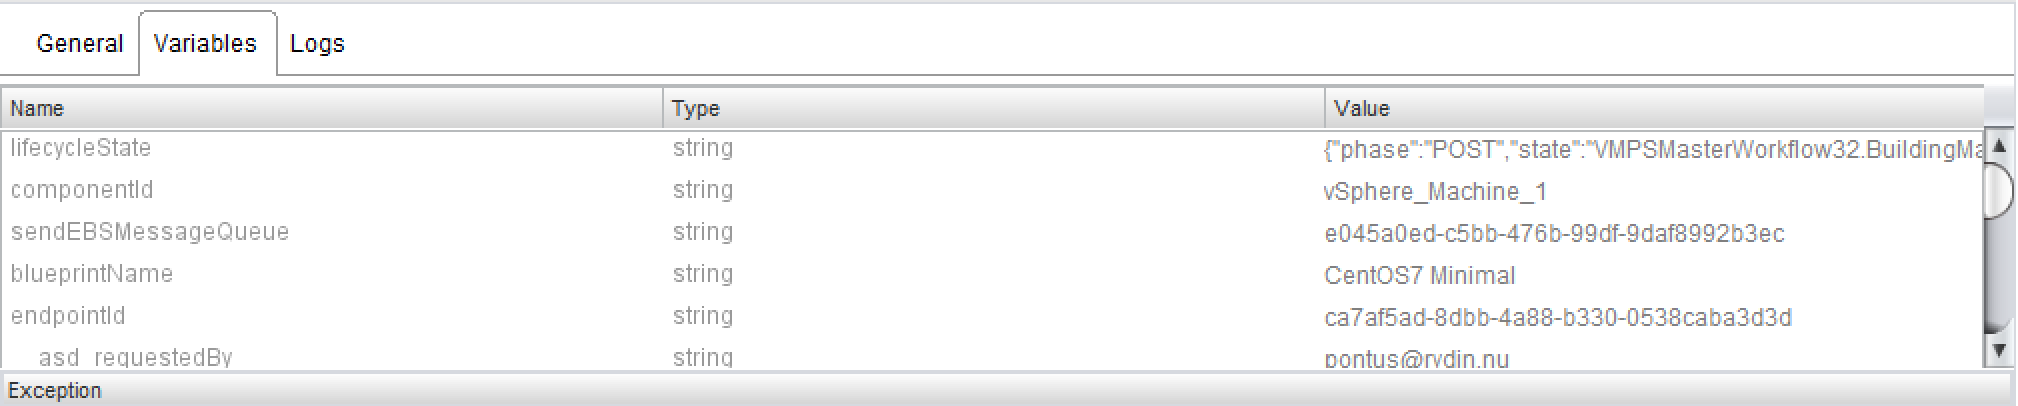
The first line parses the “machine” parameter passed by the Event Broker. If you recall from our previous article, this variable contains all the information about the machine being provisioned encoded as JSON. Once we’ve parsed it, we can treat it as an associative array and pull values out of it.

The last two lines simply pull out the CPU count and memory size and sets them as attributes on the workflow so that they can be picked up by the subsequent checks.

Checking the resources

Next, we have two sets of checks. The first one checks CPU and memory allocation against our “hard” limit and throws an exception if we are in violation. Throwing an exception in response to a “BuildingMachine” event will stop the entire provisioning workflow with an error status.

The second set of checks test against the soft limit. If we violate that limit, the provisioning workflow will continue, but an email will be sent to an administrator advising them that a soft limit was violated. The only thing of interest in this branch is the building of the email message and subject line from the machine data.

Screen Shot 2016-01-19 at 2.43.51 PM

Here we’re reusing the “parsedMachine” structure we gained from parsing the input parameters. All we have to do is to reach into it for the machine name and the owner and merge that into a subject line and message body.

Testing it

To test the event subscription, we provision three machines: One that doesn’t violate any limits, one that violates a soft limit and one that violates a hard limit.

If things work correctly, two out of the three deployments should work and you should see an email looking similar to this:


Behavior and limitations

There are some important rules and limitations you should be aware of when it comes to blocking event subscriptions. These are the most important ones:

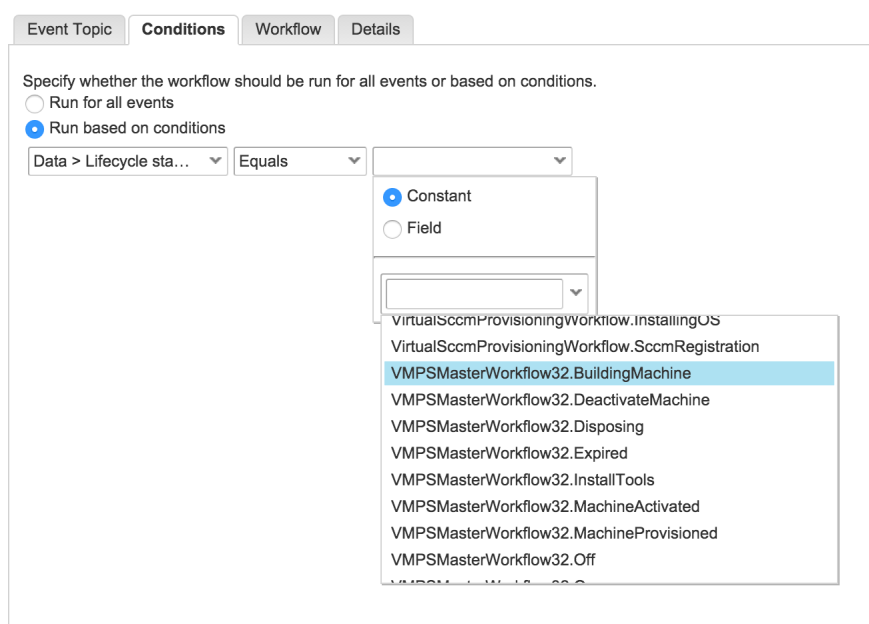
  1. You may only stop a vRA workflow from a subscription in the PRE-state of an event. In other words, you have to stop it before any default processing related to that event takes place.
  2. Currently, stopping a vRA workflow by throwing an exception is only supported in the following states: BuildingMachine, MachineProvisioned, MachineRegistered. Throwing an exception in any other state does NOT stop the provisioning workflow. If you want to stop the provisioning workflow from any other state, see below!
  3. As mentioned above, the subscription must be marked as “blocking” once it’s created.

Changing the progression of a workflow

As mentioned above, provisioning workflows are only stopped on error if they are in any of three distinct states (BuildingMachine, MachineProvisioned, MachineRegistered). If you want to stop a workflow or change its progression from another state, you still can but the mechanism is different.

Remember the workflow parameters we discussed in part 1? It turns out that if your vRO workflow responds to a blocking subscription, you can declare some of the parameters as outputs and change their value from within the workflow. This can be very useful for workflows that update the machine name, for example. But there is also a special parameter called “virtualMachineEvent” we can use to control the progression of a workflow.

All we have to do is to assign the name of an event to the “virtualMachineEvent” variable and that event will be processed by the vRA provisioning workflow. There are many different events a provisioning workflow can accept (see the full list here), but the ones we’re interested in here are “BuildFailure” and “BuildSuccess”. As you may have noticed, when you send events, you skip the leading “On” in the event name, so “OnBuildFailure” becomes “BuildFailure”.

Let’s look closer at these two events:

  • BuildFailure – Stops the provisioning workflow in a failed state.
  • BuildSuccess – Stops the provisioning workflow in a success state.

Assume you want to stop the workflow at a failure in a state that doesn’t allow you to stop it by throwing an exception. All you would have to do is to declare “virtualMachineEvent” as an output parameter of your workflow and set it to “BuildFailure” like this:

Screen Shot 2016-01-20 at 2.08.35 PM

For this to work, two requirements have to me met:

  • The subscription must be blocking.
  • The subscription must be in response to the PRE-condition of the event.

Conclusion

This installment in the series about the Event Broker has been focusing on blocking subscriptions, i.e. subscriptions where you can change the outcome of a provisioning workflow. We started by showing how you can stop a workflow in certain states by throwing an exception and went on to a more generic version of workflow control using the virtualMachineEvent variable.

In the next installment, we will discuss more “exotic” events, such as log events and blueprint editing events.

Downloads

The sample workflow discussed in this article can be found here.

Advertisement

Exploring the vRealize Automation 7.0 Event Broker – Part 1

Abstract

One of the most prominent additions to vRealize Automation 7.0, aside from the converged blueprints, is a feature called the Event Broker. This service provides a uniform and robust way of subscribing to and responding to various events originating from vRA. It allows you to plug in actions and checks throughout a machine life cycle, but it goes further than that. With the Event Broker, you can subscribe to other events as well, such as blueprint lifecycle events, approval events and system log events.

This article aims to explore the Event Broker and to show a few examples of how it may be used.

Event Broker architecture

The design of Event Broker is, in essence, a classic publish/subscribe architecture. In other words, the service acts as an event distribution point where producers of events can publish them and consumers can subscribe to specific event streams. Clients would typically subscribe to a category of events, typically known as a “topic”. Events are often filtered even further using conditions, e.g. subscribing to events only from a certain part of the life cycle or only for a certain type of objects. Unlike a traditional publish/subscribe architecture, subscribers of the Event Service can also control the underlying workflow using “blocking events”, which we will discuss in more depth in upcoming articles.

Under the hood, the Event Broker is implemented using a persistent message queue, but most users are probably going to interact with it using vRealize Orchestrator (vRO). When an event that matches the topic and condition for a subscription is triggered, a corresponding vRO workflow is started.

Each topic has a schema that describes the structure of the data carried by the event. For example, a machine provisioning event carries data about the request, such as the name of the user making the request, the type of machine, amount of CPU and RAM, etc.

It’s important to remember that event subscriptions will trigger on any object that’s applicable to the topic. In vRA 6.x, you would typically tie a subscription to a specific blueprint, but with the Event Broker, you would get any event for any machine from any blueprint. In order to restrict that to specific blueprints or machine types, you will have to use a conditional subscription. While there is a slight learning curve involved, the end result is a much more flexible and efficient event mechanism.

Taking the Event Broker for a spin

Enough of theory and architecture for now. Let’s take it for a spin and see if we can get it to work!

A Hello World example

First, let’s just see if we can get the Event Broker to trigger a workflow on any event during a VM provisioning. Let’s create a simple vRO workflow that looks like this:

Screen Shot 2016-01-07 at 10.27.27 AM

Our workflow takes no parameters and just prints a string to the vRO system log. Let’s save it and go back to vRA. In vRA, we go to Administration->Events-Subscriptions and click the “New” button (the plus). This is what we’ll see:

Screen Shot 2016-01-07 at 10.34.49 AM

As we discussed earlier, an event topic is just a category of events you can subscribe to. Since we were going to trigger our vRO workflow on provisioning events, we select “Machine provisioning” from the list of topics. Once we select the topic, we’ll see the schema for it, i.e. a description of the data carried by the event. As you can see from the screen shot, we now have access to all the data about the request and the machine being requested. Let’s click the Next-button and go to the next screen!

Screen Shot 2016-01-07 at 10.37.22 AM

Here we can choose between subscribing to all events or to do it based on a condition. A machine provisioning triggers multiple events: When the machine is built, software is provisioned, turned on and so on. Normally we’d add some conditions to pick exactly the events we want, but in this case, let’s just go with everything. Let’s go to the next screen!

Screen Shot 2016-01-07 at 10.40.17 AM

This dialog let’s us pick the vRO workflow to run. We’re going to pick the “Hello World” workflow we just created. Let’s just click “Next” and “Finish” from here and we’ll have a subscription called “Hello World”, since it gets the workflow name by default.

Screen Shot 2016-01-07 at 10.43.01 AM

The last thing we need to do is to select the subscription and click publish. Like most objects in vRA, they are initially saved in a draft state and need to be activated before they kick in. Now we’re ready to test out workflow! Let’s go request a machine and wait for it to complete! Once the provisioning has completed, we can go to vRO to check on our workflow. It should now have a bunch of tokens (executions) and look something like this:

Screen Shot 2016-01-07 at 10.52.25 AM

Why so many executions? Remember that the provisioning process generates an event per state it goes through, so you’ll see a lot of events, since there’s a lot of states to go through. And in fact, there’s two events generated per state, one just before it goes into the state and one just after it leaves it. We call these pre-events and post-events.

Congratulations! We’ve created our first event subscription!

Where are the parameters?

So far, our event subscription is pretty useless, since all it can do is to print a static string to the log. We don’t know anything about what kind of event we received or which object it was triggered for. To build something more interesting than just a “Hello World”, we’ll need access to the event parameters. But where are they?

Let’s click on one of the workflow tokens in vRO and select the variables tab!

Screen Shot 2016-01-07 at 10.58.28 AM

Looks interesting! So it appears that all the variables from the event schema were actually sent to the vRO workflow. But how can we access them? That turns out to be very simple! Just create an input parameter to your vRO workflow with the same name and type as the event variable.

Let’s add the input parameters “lifecycleState” and “machine” to our workflow! This should give us information on what state we’re in and the machine that triggered the event. Let’s also change the code of our scriptable task a bit to look like this:

Screen Shot 2016-01-07 at 11.04.59 AM

Each time we get an event, we’re going to print information on what lifecycle state we’re in and what machine we’re provisioning. Provisioning a machine should get you a log record that looks something like this:

Screen Shot 2016-01-07 at 11.09.49 AM

The state information deserves a closer look. It’s made up of two variables: A phase and a state. The state simply corresponds to the machine states you may be familiar with from IaaS. “VMPSMasterWorkflow32.BuildingMachine” means that the machine is in the initial building stage. The “phase” variable says “PRE” in this example, which means that we caught this event just before the initial build happened. Had it said “POST”, we would have gotten it right after the initial build was done.

And, by the way, those lifecycleState and machine variables are encoded as JSON strings. If you want to manipulate them as associative arrays/dictionaries instead, just call e.g. JSON.parse(lifecycleState). We’ll be doing that in some of the more advanced examples.

Adding a condition

At this point, we have a semi-interesting example of an event subscription. But it’s triggering on every single event for every single VM being provisioned. In a real life scenario, this wouldn’t be very nice to your vRO instance. So let’s dial things down a bit by introducing a condition to our subscription.

To do this, we need to go back to Adminitration->Events->Subscriptions and click on our “Hello World” subscription to edit it. Then we go to the “Conditions” tab and select “Run based on conditions”.

Screen Shot 2016-01-07 at 11.22.21 AM

The condition can be any test on any field, or a combination of several fields. In our case, we’re just going to select the lifecycle state name.

Screen Shot 2016-01-07 at 11.22.49 AM

Let’s do a simple “equals” operation and test against a static value. The drop-down allows us to select from a list of predefined value. In this case, we want to trigger only if we’re in the “BuildingMachine” state.

We’re now saving the subscription by clicking “Finish” and testing it by provisioning another VM. This time, we should only see two executions of our vRO workflow: The PRE and POST events for “BuildingMachine”.

Conclusion

This is the first installment in a series of articles on the Event Broker in vRA 7.0 and is intended to get you familiarized with the new functionality. While the examples given aren’t useful for real-life scenarios, they might serve as templates for more realistic workflows.

In the next installment (coming soon) of this series we are going to look at more useful examples, such as an auditing workflow imposing hard limits on resource usage. If that sounds interesting, I recommend you add this blog to the list of blogs you follow!