A Simple Template for vR Ops Python Agents

Background

Since I wrote the post about vraidmon, I’ve gotten some requests for a more generic framework. Although what I’m describing here isn’t so much a framework as a simple template, some may find it useful. You can find it here.

What does it do?

In a nutshell, this template helps you with three things:

  1. Parsing a config file
  2. Simplifying metric and properties posting
  3. Simplifying management of parent-child relationships.

The config file

The template takes the name of a configuration file as its single argument. The file contains a list of simple name/value pairs. Here is an example:

vropshost=vrops-01.rydin.nu
vropsuser=admin
vropspassword=secret
adapterSpecific1=bla
adapterSpecific2=blabla

The vropshost, vropsuser and vropspassword are mandatory and specify the host address, username and password for connecting to vR Ops. In addition to this, adapter specific configuration items can be specified.

Writing the adapter

Screen Shot 2015-12-22 at 3.51.03 PM

Using this template is very easy. Just locate the “YOUR CODE GOES HERE” marker and start coding! The only requirement is that you have to set the adapterKind and adapterName variables.

Setting the adapter type and name

The adapterKind is the “adapter kind key” for the adapter you’re building. It basically tells the system what kind of adapter you are. You can really put anything in here, but it should be descriptive to the adapter type, such as “SAPAdapter” or “CISCORouterAdapter”.

The “adapterName” is a name of this particular instance of the adapter. There could very well be multiple adapters of the same type, so a unique name is needed to tell them apart.

Posting data

Once we’ve got the adapter naming out of the way, we can start posting data. This is done through the “sendData” function. It takes 5 parameters:

  1. The vR Ops connection we’re using
  2. The resource type we’re posting for. This should uniquely specify what kind of object the data is for. E.g. “CISCORouterPort” if we’re posting data about a port.
  3. Resource name. This uniquely identities the object we’re posting data for, e.g. “port-4711”.
  4. A name-value pair list of metrics we’re posting for the resource, e.g. { “throughput”: 1234, “errors”: 55 }
  5. A name-value pair list of properties we’re posting e.g. { “state”: “functional”, “vendor”: “VMware” }

The sendData function returns the resource we posted data for. Note that if the resource didn’t already exist, it will be created for you.

Building relationships

Sometimes you want your monitored resources to be connected to some parent object. For example, if you are monitoring tables in a database, you may want them to be children of a database object. This way, they will show up correctly in dependency graphs in vR Ops and your users will find it easier to navigate to them.

To form a parent-child relationship, use the addChild function. It takes the following parameters:

  1. The vR Ops connection to use
  2. The adapter kind of the parent object
  3. The adapter name of the parent object
  4. The resource kind of the parent object
  5. The resource name of the adapter object
  6. The child resource to add
  7. (Optional) A flag determining whether parent objects should be automatically created if they don’t exist. By default, they are not automatically created and adding a child results in a no-op.

Here’s an example of an agent using this template that monitors Linux processes. As you can see, we’ve used the “addChild” function to add the Linux process objects to a Linux host.

Screen Shot 2015-12-22 at 4.10.51 PM.png

Downloadable content

Github repository: https://github.com/prydin/vrops-py-template

Advertisement

vraidmon – A vRealize Operations Adapter Written in Python

Background

Two events coincided today: Realizing that I’ve been running without redundancy on a Linux software RAID coincided with me having some time to spare for a change. So I decided to write a simple vR Ops agent to monitor a software RAID, and, since I had some time on my hands, I wanted in Python instead of my go-to language Java. This is my very first Python program, so bear with me.

Learning Python proved to be very easy. It’s a very intuitive language. I’ve got some issues with loosely typed languages, but for a quick hack I’m willing to put that aside. What turned out to be a bit more difficult was to find any good examples of agents for vR Ops written in Python. The blog vRandom had a getting started guide that allowed me to understand how to install and get the thing running, but how to code the actual agent was harder to find. But after some trial and error I got the hang of it and I decided to share my experience here.

A quick look at the code

Initializing

The client library is called “nagini”, so before we can do anything, we need to import it:

import nagini

Next, we need to obtain a connection to vR Ops. This is done like this:

vrops = nagini.Nagini(host=vropshost, user_pass=(vropsuser, 
vropspassword))

It’s worth noticing that this doesn’t actually make the connection. It just sets up the connection parameters. So if you do something wrong, like mistyping the password, this code will gladly execute but you’ll get an error later on when you’re trying to use the connection.

Sending the data

Here is where things get quite interesting and the Python client libraries show their strength. While all the REST methods are exposed to the programmer, the libraries also add some nice convenience methods.

Normally, when you post metrics for a resource, you need to do it in three steps:

  1. Look up the resource to obtain its ID.
  2. If the resource doesn’t exist, create it.
  3. Send the metrics using the resource ID you just obtained by looking it up or creating it.

The vR Ops Python client can do this in a single call! All we have to do is to put together somewhat elaborate data structure and send it off. Let’s have a look!

Screen Shot 2015-12-15 at 9.21.09 AM

Wow, that’s a lot of code! But don’t despair! Let’s break it down. In this example, I’m sending but stats and properties. If you recall, stats are numeric values, such as memory utilization and remaining disk space, whereas properties are strings and typically more static in nature. Let’s examine the stats structure.

The REST API states that stats should be sent as a single member called “stat-content”. That member contains an array of sub-structures, each representing a sample. Each sample has a “statKey” holding the name of the metric, a “timestamp” member and a “data” member holding the actual data value. As you can see above, I’m sending three values, the “totalMembers”, “healthyMenbers” and “percentHealthy”.

Now that we have our fancy structure, we can send it off using the find_create_resource_push_data method. It does exactly what the name implies: It tries to find the resource, if it doesn’t it creates it and then it pushes the data. To make it woek, we need to send the name of the resource, the name of the resource kind as well as adapter kind and the stats and/or properties. And that’s it! We’ve now built an adapter with Python using a single call to the vR Ops API!

What about the timestamp?

But wait, there’s one more thing we need to know. The vR Ops API expects us to send a timestamp as a Java-style epoc milliseconds long integer. How do we obtain one of those in Python.

Easy! We just time.time() method (you have to import “time” first). This gives us the epoc seconds (as opposed to milliseconds) as a float, so we have to multiply it by 1000 and convert it to a long. It will look something like this:

timestamp = long(time.time() * 1000)

Installing and running

Prerequisites

First of all, you need to install python (obviously). Most likely it’s already installed, but if it isn’t, just go to the package manager on your system and install it. Next, you need the client libraries for vR Ops. They are located on your vR Ops server and can be downloaded and installed like this:

mkdir tmp
cd tmp
wget --no-check-certificate https://<your vrops server>/suite-api/docs/bindings/python/vcops-python.zip
unzip vcops-python.zip
python setup.py install

Installing the agent

Download the agent from here. Unzip it in the directory where you want to run it, e.g. /opt/vraidmon

mkdir /opt/vraidmon
unzip <path to my zip>

Next, we need to edit the configuration file vraidmon.cfg. You need to provide hostname and login details for your vR Ops. The name of the raid status file should remain /proc/mdstat unless you have some very exotic version of Linux. Here is an example:

vropshost=myvrops.mydomain.com
vropsuser=admin
vropspassword=topsecret!
mdstat=/proc/mdstat

Now you can run the agent using this command:

python vraidmon.py vraidmon.cfg

You’ll probably get some warning messages about certificates not being trusted, but we can safely ignore those for now.

Making it automatic

Running the agent manually just sends a single sample. We need some way of making this run periodically and the simplest way of doing that is through a cron job. I simply added this to my crontab (ignore any line breaks and paste it in as a single line):

*/5 * * * * /usr/bin/python /opt/vraidmon/vraidmon.py /opt/vraidmon/vraidmon.cfg 2> /dev/null

Adding alerts

In order for this adapter to be useful, I added a simple alert that fires when the percentage of healthy members drops below 100%. This is what a simulated failure looks like:

Screen Shot 2015-12-15 at 11.30.49 AM.png

Downloadable material

Python source code and sample config file.

Alert and symptom definition.


$500 Poor Man’s vCloud Suite Lab

Yes, I’m cheap!

I guess I’m a bit cheap when it comes to buying equipment for my lab. To be honest, I’m more interested in funneling money to my hobbies and my wife’s hobbies than spending money on an elaborate lab. However, since I felt the need of a true sandbox where I could experiment freely, I arrived at a point when a home lab was more or less necessary.

So I set out to create the most inexpensive lab that would still get the job done. It became almost an obsession. Was it possible to build a viable lab for less than $500? The result was pretty astonishing, so I decided I wanted to share it.

Requirements

I needed a demo lab where I could run most or all of the vCloud Suite products as well as NSX. It didn’t have to be extremely beefy, but fast enough to run demos without making the products look slow. Here’s a condensed list of requirements:

  • Run the basic components of the vCloud Suite: vRealize Automation, vRealize Orchestrator, vRealize Operations, LogInsight.
  • Run some simulated workloads, including databases and appservers.
  • Run a full installation of NSX
  • Provide a VPN and some simplistic virtual desktops.
  • Have at least 1GB Ethernet connections between the hardware components.

Deciding on hardware

I did a lot of research on various hardware alternatives. Let’s face it: What it comes down to is RAM. In a lab, the CPUs are waiting for work most of the time, but the vCloud Suite software components eat up a fair amount of memory. I calculated that I needed about 100GB or RAM for it to run smoothly.

At first, I was looking at older HP Proliant servers. I could easily get a big DL580 with 128GB RAM for about $200-300. But those babies are HUGE, make tons of noise and suck a lot of power. Living in a normal house without a huge air conditioned server room and without a $100/month allowance for powering a single machine, this wasn’t really an alternative.

My next idea was to buy components for bare-bones systems with a lot of memory. I gave up that idea once the value of my shopping cart topped $3000.

I was about to give up with I found some old Dell Precision 490 desktops on eBay. These used to be super-high-end machines back in 2006-2007. Now, of course they are hopelessly obsolete and are being dumped on eBay for close to nothing. However, they have two interesting properties: They run dual quadcore Xeon CPUs (albeit ancient) and your can stuff them with 32GB of RAM. And, best of all, they can be yours for about $160 from PC refurbishing firms on eBay. On top of that, memory upgrades to 32GB can be found for around $40.

Waking up the old dinosaurs

So thinking “what do I have to lose?” I ordered two Dell Precision 490 along with a 32GB memory upgrade for each one. That all cost me around $400.

I fired everything up, installed ESXi 6 and started spinning up VMs with software. To my surprise and delight, my old dinosaurs of ESXi servers handled it beautifully.

vms

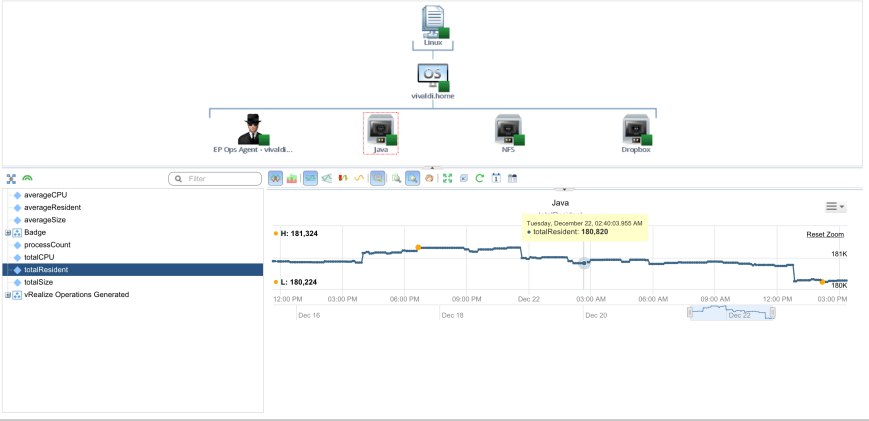
Here’s what vRealize Operations had to say about it.

vrops lab

As you can see, my environment is barely breaking a sweat. And that’s running vRealize Operations, vRealize Operations Insigt, vRealize Automation 6.2, vRealize Operations 7.0 Beta, NSX controllers and edges along with some demo workloads including a SQL Server instance and an Oracle instance. Page load times are surprisingly fast too!

A Jumbo Sized Problem!

After a while I noticed that some NSX workloads didn’t want to talk to each other. After some troubleshooting I realized that there was an MTU issue between the two ESXi servers. Although the Distributed vSwitch was configured for an MTU of 6000 bytes without complaining, the physical NICs were still pinned at 1500 bytes MTU. Turns out, the on-board NIC in the Precision 490 doesn’t support jumbo frames.

The only way to fix this seems to be to use another NIC, so I went back and got myself two Intel PRO/1000 GT Desktop Adapters. They normally run about $30-35, but I was lucky enough to find some Amazon vendor who had them on sale for $20 a piece. If you didn’t already know it, the Intel PRO/1000 GT has one of the most widely supported chipsets, so it is guaranteed to run well with virtually any system. And it’s cheap. And supports jumbo frames.

How much did I spend?

I already owned some of the necessary components (more about that later), so I cheated a little when meeting my $500 goal. Here’s a breakdown of what I spent:


$320 – 2x  Dell Precision 490 2×2.66GHz Quad Core X5355 16GB 1TB

$80 – 2x 32GB Memory Upgrade

$40 – 2x Intel PRO/1000 GT


This adds up to $440. Add some shipping to it, and we just about reach $500.

Vendors

I got the servers from the SaveMyServer eBay store. Here is their lineup of Dell Precision 490.

The memory is from MemoryMasters.

The network adapters are from Amazon. There’s a dozen of vendors that carry it. I just picked the cheapest one.

What else do you need?

In my basement I already had the following components:


1 Dell PowerEdge T110 with 16GB memory

1 old PC running Linux with 2x 2GB disks in it.

1 16 port Netgear 1GB/s Ethernet switch.


Assuming you already own a switch and some network cables, you’ll need at least some kind of NAS. I just took an old PC, loaded CentOS on it and set up and NFS share. That worked fine for me. Not the fastest when you’re seeing IO peaks, but for normal operations it runs just fine. You can also get e.g. a Synology NAS. With some basic disks, that’s going to set you back about $300.

I already had an old ESXi server (the PowerEdge T110) and I decided to run my AD, vCenter and NSX Manager on it. I could probably have squeezed it into the two Precision 490, but it’s a good idea to run the underpinnings, such as vCenter and AD on a separate machine. If I didn’t already had that machine, I would probably have ordered three of the Precision 490 and used one for vCenter and AD.

Room for improvement

Backup

The most dire need right now is backup. Although my NAS runs a RAID1 and gives me some protection, I’m still at risk of losing a few weeks of work in setting up vCloud Suite the way I wanted it. I’ll probably buy a Synology NAS at some point and set it up to replicate to or from my old NAS.

Network

Currently, everything runs on the same physical network. This is obviously not a good design, since you want to at least separate application traffic, management traffic, storage traffic and vMotion into separate physical networks. I might not get to four separate networks, but I would like to separate storage traffic from the rest. Given that I have free NIC on the motherboard, it’s just a matter of cabling and a small switch to get to that point.

Backup power

I’ve already had a power outage in my house since I built this lab. And booting up all my VMs on fairly slow hardware wasn’t the greatest thing in the world. I’ll probably get a small UPS that can last me through a few minutes of power outage, at least until I can get my generator running.

A final word

If you have a few hundred dollars and a few days to spend, I highly recommend building a simple lab. Not only is it great to have an environment that works just the way you want it, you’ll also learn a lot from setting it up from scratch. In my line of work, the infrastructure is already there when I get on the scene, so it was extremely valuable to immerse myself into everything that’s needed to get to that point.

I’d also like to thank my friend Sid over at DailyHypervisor for his excellent tutorials on how to set up NSX. I would probably still have been scratching my head if it wasn’t for his excellent blog. Check it out here on DailyHypervisor.